Thursday, September 13, 2012

Lecture Schedule


Lecture Schedule
Fall 2012
You know how I love to see you at these shows, so if you are in the areas please make them part of your day.
Most all talks start at 6:30 or 7:00
Oct 3rd                                  Marlborough NH             Frost Free Library
Frost Free Library  28 Jaffrey Road  PO Box 457  Marlborough, NH 03455


Oct 9th                             East Kingston NH       EasKingston Public Library
East Kingston Public Library, 47 Maplevale Road

Oct 30th                            Stratham NH             Stratham Public Library
Wiggin Memorial Library  10 Bunker Hill Ave    Stratham, NH 03885


Nov 6th                            Litchfield NH            Litchfield Public Library
Aaron Cutler Memorial Library  269 Charles Bancroft Hwy.  Litchfield, New Hampshire 03052
603.424.4044 

Nov 15th                         Salem NH                    Salem Public Library
Kelley Library  234 Main Street  Salem, NH 03079  603-898-7064


Nov 27th                         Concord NH                Concord Public Library
Concord Public Library   45 Green Street  Concord, NH 03301  (603) 225-8590           

Nov 29th                         Hooksett NH                Hooksett Public Library
finishing off the year with a talk in my home town of Hooksett

PVC and your shop, a wonderful combination


PVC and your shop, a wonderful combination
Having used PVC pipe in plumbing and other projects it was only a matter of time before it became a staple in my shop. Here are some of the most obvious uses. I would encourage you, dear reader to think up more ingenious uses and tell me about them.

Used to center the weight during the glue up:

One problem I was having was an unnecessarily wide glue line in-between my rings. I discovered that often this was due to uneven weight distribution or placing weight (sometimes I use my old workout weights instead of clamps) in the center of a wider ring causing a push out or cupping effect making the glue lines noticeably wider around the circumference of the rings. The solution was simple; distribute the weight evenly and directly over the glue up area. PVC in the 6, 8 and 10 inch come in real handy for this.

Used to lengthen your tool handles:

I love long tool handles but they can be a pain to store, so I simple use one and a half or one and a quarter PVC and jamb them into the handle ends and now your tool handle is as long as your comfort zone. A dowel in the non tool end with a tap or two and it is released and ready to be put back in the drawer. For this I would suggest schedule 40 or the heavier PVC pipe as a means to reduce vibration.


As a storage device for face plates:

Face plates can be difficult to store and work with off the lathe. 6 inch PVC 6 or so inches long and you are no longer chasing them across the shop floor or scraping your countertops with the threaded end of the face plate.

As tool storage on your lathe or counter top or wall area:

This is one I use constantly. Using multiple lathe tools on a project can give you a mess or at least spending too much time finding a tool you just put down. Attaching different diameter lengths of 4 to 6 inches gives the storage right where you need it. Believe it or not on some projects every one of these has one tool or another in it. You will notice here that I also place weight on my lathe bottom. The more the merrier as it is an eliminator of vibration to a lathe that is not bolted to your shop floor.


As a storage area for drills and screw guns:

Organizing my screw guns with PVC was one of the best and most productive things I did with PVC. I picked it up off a woodworking mag and man am I thankful. The biggest benefit was the mess it cleaned up and the counter top space it freed up. Here you see 10 to 12 inch 4 inch schedule 40 with the first 4 to 6 inches of its bottom in a 2 inch width cut away and mounted to the underneath of a counter area. The guns or drills slip in like a holster. In between the guns I have mounted the chargers so the batteries you see are recharging while being stored.

Finally, I use PVC as a dying chamber:

I have been using wood dye as a means of getting different effects and accents in my projects. It began with ‘ebony X’ a process of using vinegar and rusted metal to make veneers of walnut and darker wood jet black. Since then I have been experimenting with many colors, red, blue, green and yellow for example add highlighs to many segmented projects with a huge wow factor. They are especially useful in my game board work highlighting and distinguishing the boards.  I will not take the time here to go over the process but as you can see each color has a ‘dying chamber’ made from PVC. The veneer is cut into one inch by 36 inch strips. Dates are used to determine the proper exposure time to the dye and they are rolled every week or so to make sure the dye impregnates the vineer uniformly.  Usally then are in the tubes for a couple of months at a minimum.

So there you have my PVC extravaganza. Remember an organized but messy shop is better and safer by far than an unorganized clean shop.

I look forward to your feedback and responces.
Please feel free to contact me at:
Or just leave a comment on the blog.


Tuesday, July 17, 2012

Just a quick note to my wandering fans
I will be at the Amherst Public Library on the 24th of July, 
Always love those familiar faces.
Also on the schedule for this fall are:
East Kingston
Stratham
Salem 
Concord
Hooksett

Hoping to see you at a lecture or too

Steve
3D Triangles
Here is another design on the right, with many of the same characteristics in the tumbling block design. I call this design the tumbling triangle design although I am sure it has many names. Since many of the techniques are similar I will spare you a lot to the comontary and try to move through the project with more pictures and less chit chat.


 Rather than a diamond here we are looking for the off angled, 4 sided shape above. Although we use the same angles as in the diamond here we assign the length of the enterior side of the shapes length to the same (exactly the same) as the cross cut of the shapes width after the miter cut has been made.
If done correctly the above traiangles can be glued in place with the help of rubber bands. Remember to clean off any excess glue from the exterior of the triangle so the next one will fit snugly along its side after the glue has dried.


Notice there are two rows. These rows may look the same but believe me they are not. To make the final product you will need equal amount of triangles both your first one and then its opposite. These are like gloves. They are identical except they are opposite or face one another. Experiment with your shapes and you will get it.


Each piece gets glued to its opposite.


here is my glue up. Very messy. Augh !!!!
But the result on the right are well worth it and is completely unique.
I assure you that none of your wifes friends or their friends friends have anything remotely like this in their kitchens.
Enjoy


3D Patterns in wood working

3D Patterns in wood working

Hey there fans.
For some time I have been experimenting with designs in wood art. Some of them make it to my grandfathers lathe and some are used in a flat design, (cutting boards, lazy susan’s etc.) The 3D concept is a fun project and although it has particular challenges, they can be overcome with practice and determination (not to mention a lot of wrongly cut pieces in the scrap bin).
So without any further ado, lets get started.

Lets start with the tumbling block design.

As you can see this design is made up of diamonds. These diamonds take some time and lots of scrap to get just right. You will need a very accurate mitre box or cutting tool to get these just so. Proceed only after you have a very tight uniform result or you will be chasing gaps and spacing in the glue up and never get a good result. Start with pine before you get into the expensive stuff. Here you see I have chosen ash, brazilian walnut and brazilian cherry. Go for an equal contrast, ie: pick types of wood of equal denisity and hardness and more important for the 3D, equal distances of diversity in color. Two colors that are similar will highlight the third and diminish the depth of the 3D’ish,ness ??? (is that a word) of the work.
Back to the cutting, each piece must be uniform in length and length of cut. What does that mean? Well, they need to be equal length across the cut and the running grain. All 4 sides must be equal for this to work. The width of your material will form 2 sides. Likewise the length of your saw cuts will form the other 2 and must be equal to the first two. This takes some practice and a couple of custom jigs to get just right. The coolness in the character of the 3D design is enhanced by the smaller diamonds but the smaller are much more difficult to get right. A smaller diamond tumbling block design is a real eye catcher every time but start with the larger on your first try for simplicity sake.
I start the gluing with 3 diamonds and a hexagon. If I use any clamping (which I usaly do not) it may be a rubber band. Holding them in place for 10 seconds is more than enough though without any assistance or clamps, then just set them aside to dry. If your cuts are right you need not force a better fit with clamps.
In all wood working you can not and should not make up for bad jointery with clamps. This will internalize stress within the piece which will some day find its way to the surface and express itself. Besides, wood has enough issues all on its own (moisture content, grain stress etc.) without us adding to the mix.

 Here we are combining the hexagons into groups of 3.  When you do it this way it is essential that you clean all the glue off the exposed or unused (exterior) sides or this glue will keep your next glue up from going well. I use my wife’s tooth brush, please don’t tell her.
Coming along fine
The problem with these 3D designs is always jointery and glue up. You are essentially gluing up hundred of joints simultantously verses multigenerational work in which the sections of multiple pieces are joined, a much easier thing to do. Jigs help but honestly it is a mess. Don’t spare on the glue, get it everywhere. Here is my glue up jig being used to hold for the belt sander. I do run these through the planer also but only for uniformity and only a 32nd or 64th off in any one pass.
Here is a hint on glue up jigs you will love. There is a material that is used to paint the ends of lumber to keep it from drying too quickly and also used to cover exotic woods so their moisture content does not change. You know the stuff right, essentially a liqud wax which hardens into a coating. This stuff is not hard to get and is sold by the gallon. I coat all my jigs with it, especalay my glue up jigs. I use it on my some of my tools also. Brush it on and wait 24 hours and nothing will stick to your jigs. It is God’s gift to those of us who love glue.
 ere is a close up of this piece which is a cutting board.
And here is the final product with edges of a 45 degree. With this design rounded edges do not seem to compliment the work. Now we finish sand up to 400 grit and apply finishing oils that are food friendly


Thursday, June 14, 2012

 Hey fans
Here is a Mechine I have been working on
For some time I have been having trouble keeping a finished or almost finished work on the lathe.
Being so far from the head stock with no tail stock (can not use a tail stock with interior work or mouth and base finish work) the piece tends to be dicy and fragile, flying across the room if you look at it wrong especially if you use a chuck like my Nova chuck.
So a couple of steal parts, some nuts and bolts and 4 roller blade wheels and this is what I came up with.
It is very noisy but after pushing and pulling during a test with this vase it seems to add a much higher level of stablility to the whole affair.
Above is it turning , below with the lathe off.
Looking forward to your comments.
I know there are expensive ones you can by but who isnt on a budget these days, right?
Keep turning.
Steve
 PS. the piece below is of black locust and brazilian Walnut. Should be nice
PSS the Manchester Public library was a hoot , next library on the schedule is Amherst on 7/24.
Be there or be , .... , well you know.


Monday, March 26, 2012

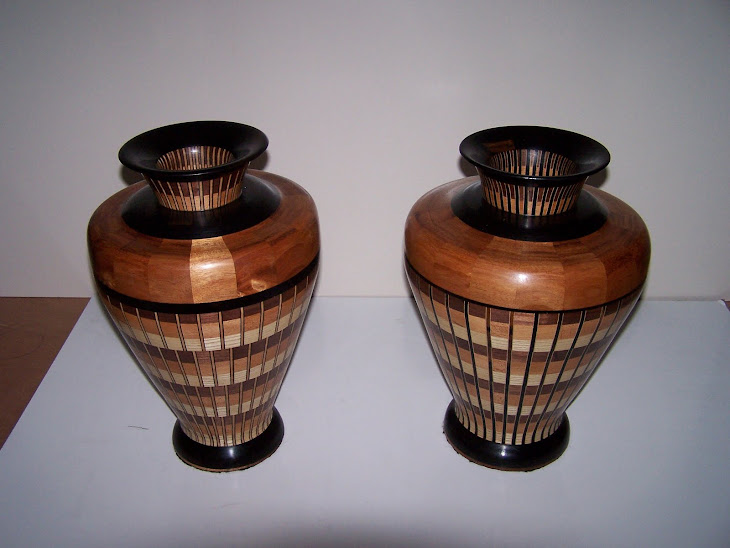
Here are a couple of vessels I just finished, fresh off the lathe.
Both have The Oats design of from
To the left a maple with walnut vase with a teak hat
On the right a segmented walnut vase with a blood wood top ring.
Both were lots of fun.
Hoping to have a web site up soon so stay posted.
Steve
P.S. I will be doing a presentation at the Sandown NH public library Tuesday March 27th at 6PM. Would love to see you there.

Well I promised you
some pics of the fruit of my triangle design so here they are
the Glue ups were very difficult because they were not multi- generational but one large glue everywhere mess. That being said still they came out nice. One vessel using a stay construction and 2 cutting boards. Let me know what you think. Triangles of Teak, walnut and cherry with some birch triangles on the edges.


Monday, February 20, 2012

I have been playing with triangles lately.
The cut out show the design I am headed toward.
Lots of rubber bands and 3 color triangles.
this is a single generation glue up , so needless to say lots of clamps and special glue up jigs are a must , but they are easy to come by and the jigs easy to make.


After playing with them for a while I have decided on two forms. A cutting board and a vase.
the upper 6 will be developed into a vase using stay construction and the lower as seen below.


These are in glue up now so in a couple of weeks they should be close to finished and on the blog.

If you are free on Feb 28 or March 7th would love to meet you.

Steve

Here is some fruit from the multi generational tree.
This one was an experiment with half step 15 degree fallowed by a peak to troft cut.
all in all , 3 generations and very simple glue ups.
then we use a stay construction to make it into a Vase.
Walnut and birch with mahogany balance rings.
Steve